Disabling write protection
Note: do not mess up short-circuiting and disabling of write protection!
Short-circuiting is used to temporarily disable the flash memory of the box.
This prevents the original software's kernel from finding its init script and opening an RSH.
This has nothing to do with write protection.
The write protection protects the first 128kb of the flash memory (bootloader).
This area has to be written to in order to enable the debug mode.
The write protection has to be temporarily disabled for this.
This is always done at the same point of time: before the debug-enable script is executed.
I do not recommend disabling the write protection at the beginning because that is a risk,
especially when using the short-circuit method. If something goes wrong, the boot loader could get deleted if it is unprotected.
This is the only time you have to disable the write protection!
You do not have to do it when flashing a new image.
The ways of disabling the write protection vary between box types:
Nokia with 2 x Intel Flash
Nokia with 2 x AMD Flash
Sagem with 1 x Intel Flash
Sagem with 2 x Intel Flash
Sagem with 2 x AMD Flash and 1 x Intel-Layout
Sagem with 2 x AMD Flash and 2 x Intel-Layout
Philips
Nokia with 2 Intel Flash
Normal method:
Above the flash chips, there are jumpers labeled
XH4 and
XH6.
Both have to be shortened.
If you happen to not have any jumpers in your box, shorten the pins just like if you had jumpers.
Also, you can solder jumper pins from other hardware, that is easier to handle if you are working on the write protection alone.
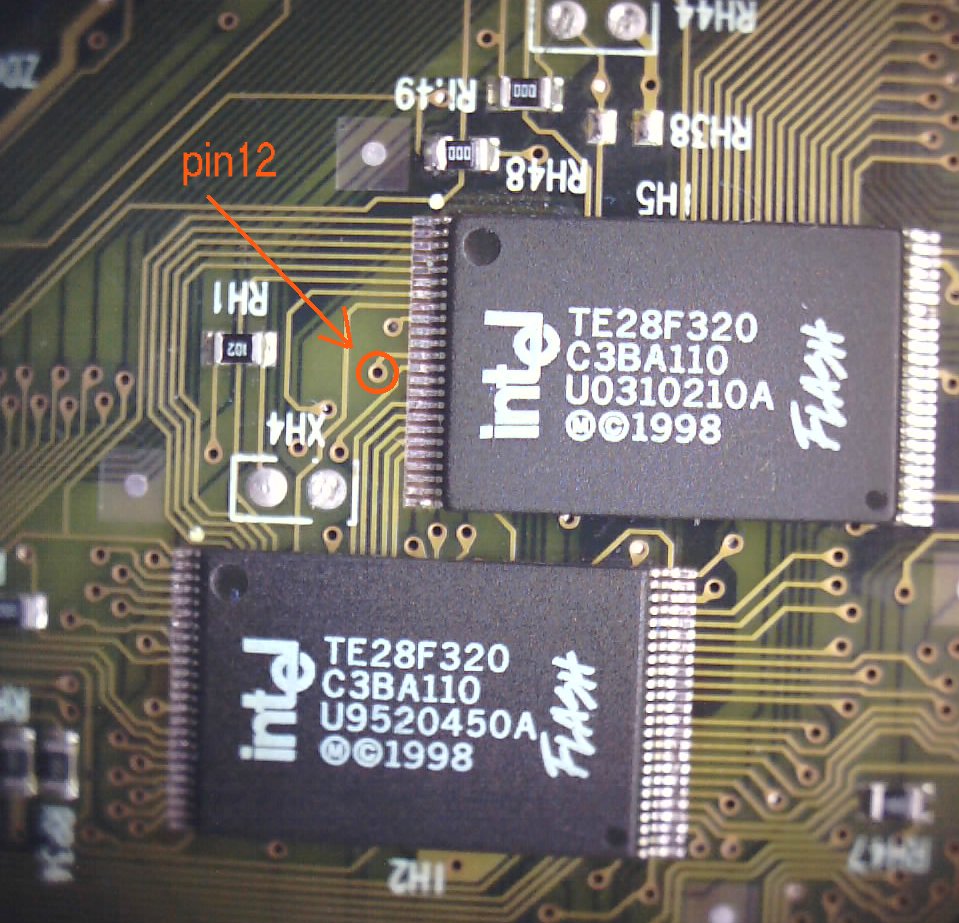
Pin 12 method:
Alternatively, you can connect
pin 12 of any flash to GND for a short amount of time (1 second is enough).
GND is available at the tuner case or at any mainboard mounting screw.
Be sure to release the contact before you execute the script.
Pin 12 can also be reached through
hole no. 8 at the bottom of the case.
Be sure to reach through the right hole, the wrong one may be deadly to your box. Do not stab wildly into the box, you have to exactly touch the right soldering spot beneath the hole.
Note:
Nokia2xI are special: most of these boxes have no working write protection due to bad manufaction.
Just try not to disable the write protection, if you want to know if you have such a box.
Nokia with 2 AMD Flash
You have to shorten the jumper
XH3 (at the front next to the card reader)
Just connect he contacts if there are no jumper pins.
Connect the contacts firmly for as long as the write protection has to be disabled.
Shortly tipping them is not enough!
If there is output in the com-terminal like:
COULDN'T WRITE, IT'S STLL
FFFFFFFF
then please sheck if there really are 9V at XH3.
Unfortunately, some boxes differ from this.
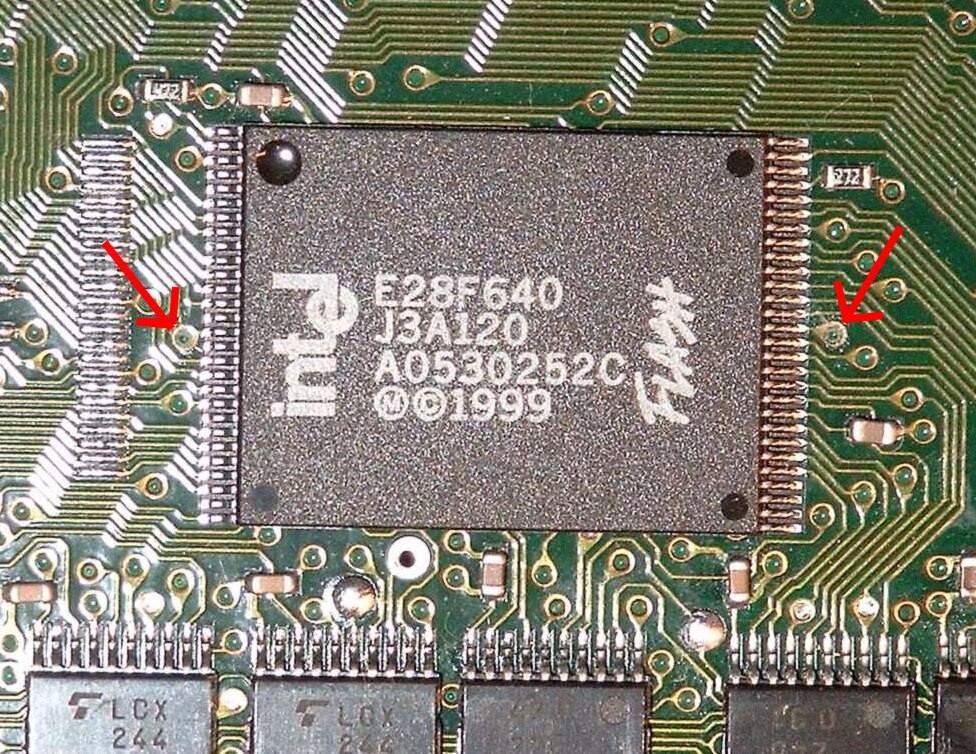
Sagem with 1 Intel - Flash
Old Method
Just connect the two spots show in
this picture.
Note that mostly there is lacquer on the pins, point right through it.
Take a cable, or if you have no suitable cable, take a clip from a bread bag.
The contacts have to be connected firmly, for as long as the write protection has to be disabled.
Shortly tipping them is not enough!
Connect this spot labeled Schreibschutz to GND.
The spot has to be connected to GND for as long as the write protection has to be disabled.
Shortly tipping it is not enough!
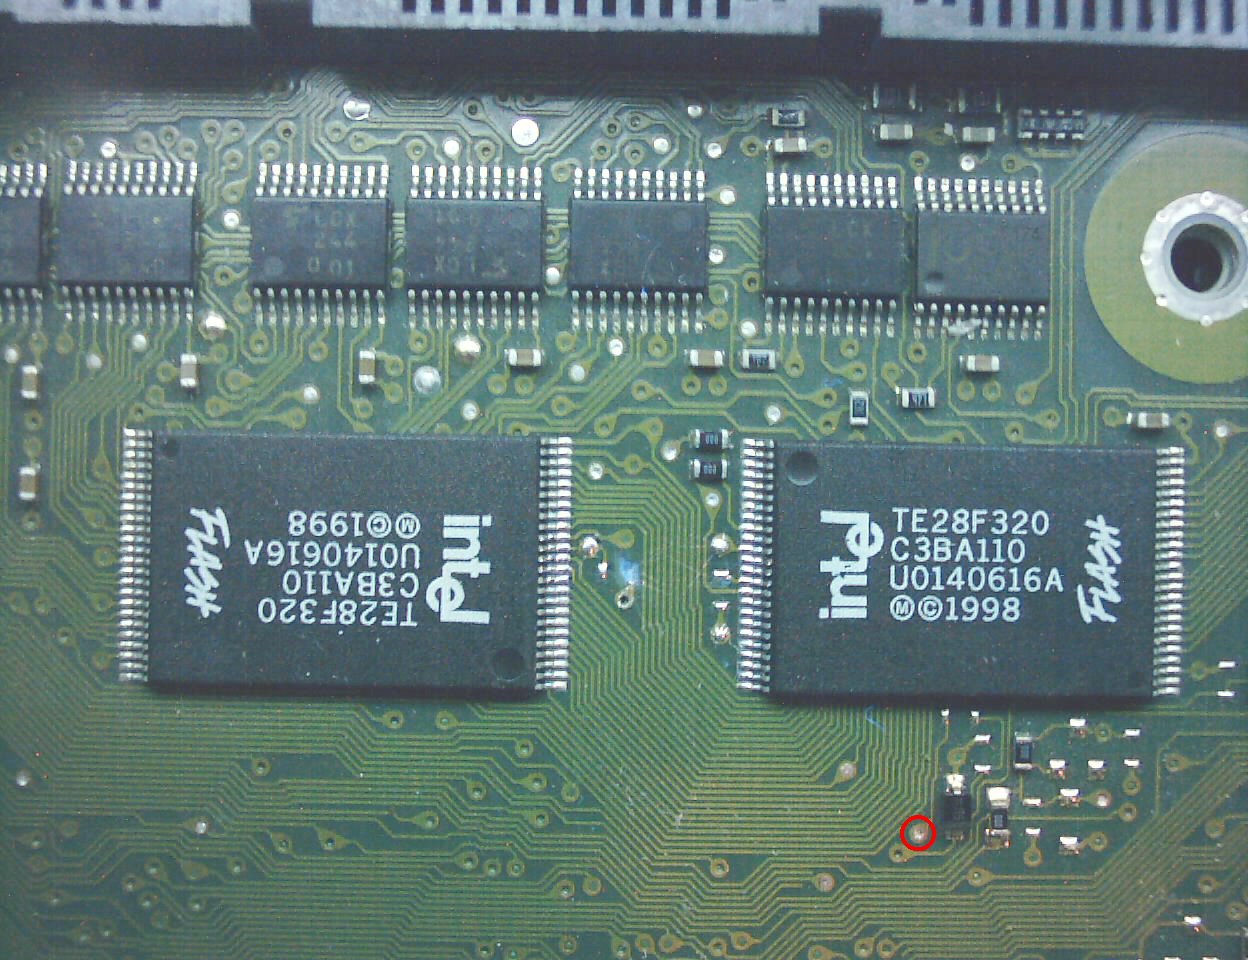
Sagem with 2 Intel - Flash
Normal Method:
Connect the spots shown in
this picture.
Note that mostly there is lacquer on the pins, point right through it.
Take a cable, or if you have no suitable cable, take a clip from a bread bag.
The safest way is to use a switch.
The contacts have to be connected firmly, for as long as the write protection has to be disabled.
Shortly tipping them is not enough!
Pin 12 method:
Alternatively, connect Pin 12 of any flash chip (use this
soldering spot)
shortly to GND (1 second is enough).
GND is available at the tuner case or any mounting screw of the mainboard.
Note that the connection has to be released before you execute the script.
Sagem with 2 AMD - Flash and 2xIntel-Layout
Just connect
these spots to
9V.
Note that mostly there is lacquer on the pins, point right through it.
Take a cable, or if you have no suitable cable, take a clip from a bread bag.
The safest way is to use a switch.
The contacts have to be connected firmly, for as long as the write protection has to be disabled.
Shortly tipping them is not enough!
Sagem with 2 AMD - Flash and 1xIntel-Layout
Just connect
these spots to
9V.
Note that mostly there is lacquer on the pins, point right through it.
Take a cable, or if you have no suitable cable, take a clip from a bread bag.
The safest way is to use a switch.
The contacts have to be connected firmly, for as long as the write protection has to be disabled.
Shortly tipping them is not enough!
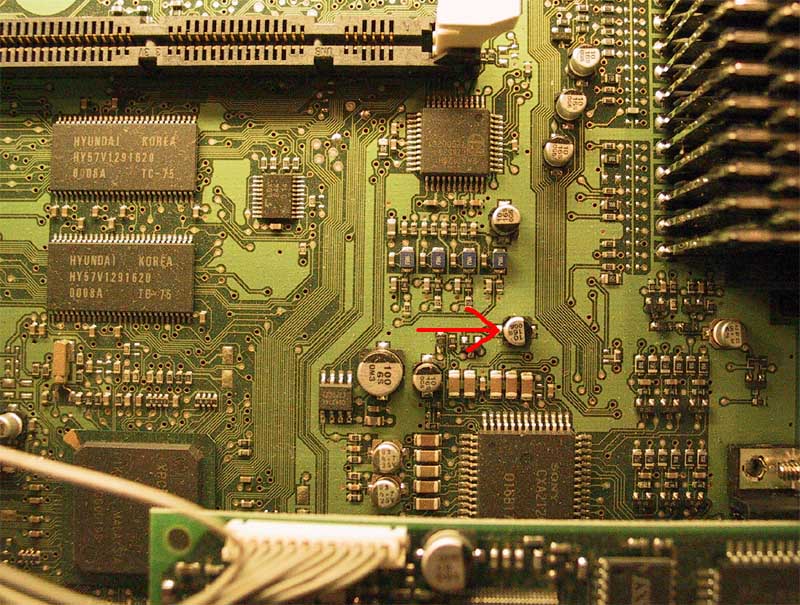
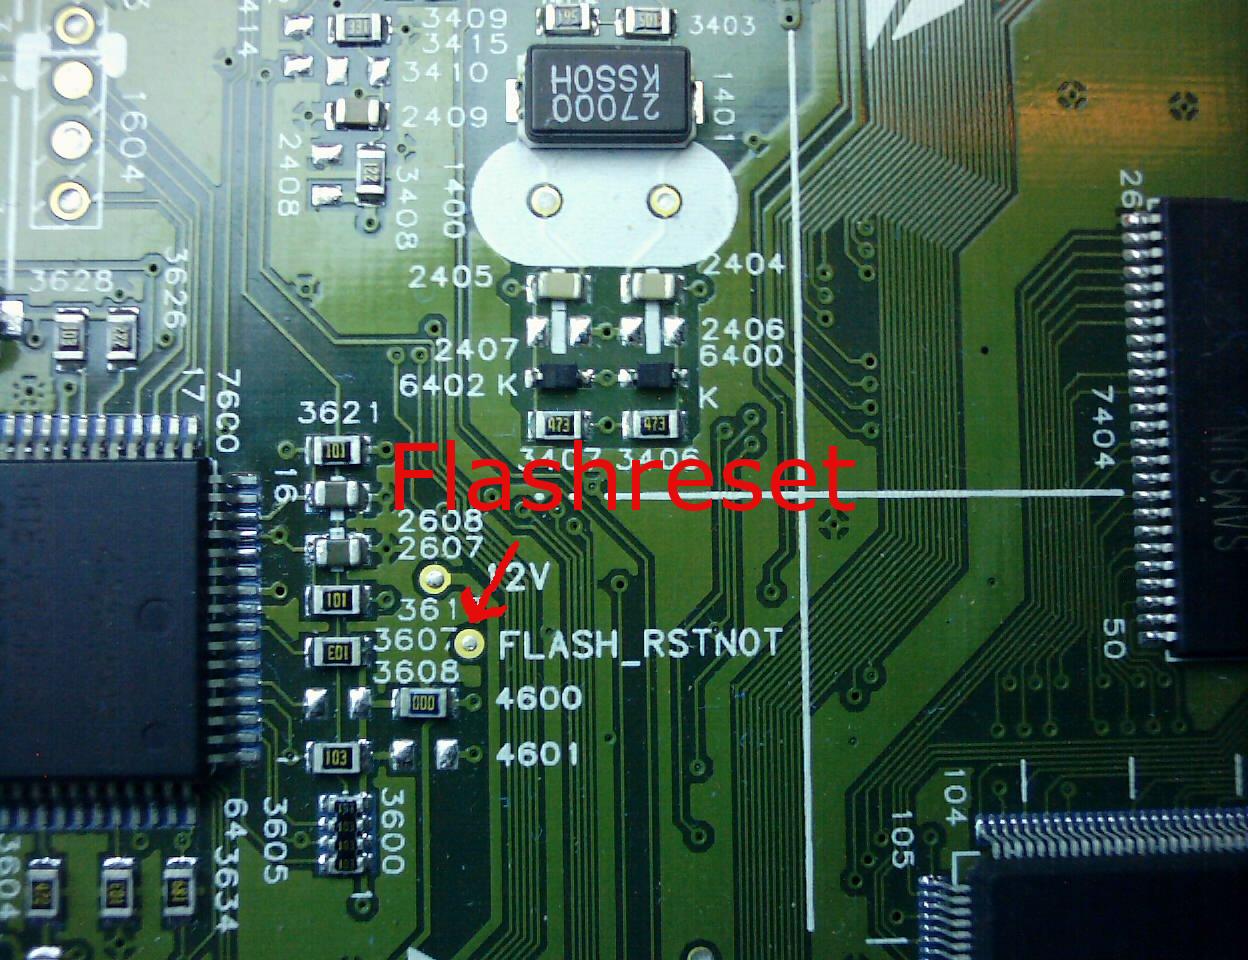
Phillips
Connect the
spot labeled "Flashreset" shortly
to GND (1 second is enough).
GND is available at the tuner case or any mounting screw of the mainboard.
Note that the connection has to be released before you execute the script!
Did it work?
After executing the debug-enable script (enable_debug, or
enable_debug with minflsh.txt), the following should be displayed in the com-terminal:
DebugEnabler (c)
tmbinc, gillem +(sagem,amd,philips) 1.8 beta
bl-version : 1.0
product? at : 10000944
current state : tmb-locked
flashrom type : 2x16 bit? yes. vendor: INTEL
unprotecting : OK!
flashing NOW : DONE !
The exact values vary between box types. What is important is the DONE in the last row.
Common mistakes:
The last row shows: flashing NOW : FAILED!!!
Disabling the write protection has not worked.
Eventuell hattet ihr irgendwo keinen sauberen Kontakt.
The output says: bl-version :
unknown, please report AFTER you read the howto.
You either still have a short circuits (do not mess up short circuit and write protection)
or you used an old tuner.so
The current tuner.so is
1.8 beta. If you see a different output in the first row, download the current
tuner.so
If you can definitely tell that neither is the case,
you may really have an unknown bootloader in your box.
In this case, consult the
Forum or visit the IRCnet channel #dbox2.
The com-Terminal reads:
DebugEnabler (c) tmbinc, gillem +(sagem/13,amd,philips) 1.8beta
bl-version : 1.0
product? at : 10000944
current state : unlocked
Please reset now!
Congratulations!
Your box is already in Debug-Mode.
There is nothing in the com-terminal
Check that you have connected the box to the PC via a
serial Nullmodem.
The serial interface's paramaters may also be wrong.
For everything that needs to start a Chorus-Kernel, the serial interface has to be set to:
Bits per second: 57600
databits: 8
Parity: none
Stopbits: 1
flow control: none
Using a different com-port or re-downloading the tuner.so may also help
(consider using a download manager).
Feedback
E-Mail
Further Assistance
If you have problems, consult the forum
or visit
the IRC channel #dbox2 using, for example, irc.freenet.de as IRC server.
Copyright
Copyright (c) 2002 by Dietmar Hölscher
Home